Dockerizing your development environment
Most development environments are not heterogenous. Over time more languages, libraries, frameworks & tools are introduced into the organisation, while others are phased out. This means that you need to keep your development environment up to date with these changes. And of course, just when you updated your environment, a legacy application experiences an issue and now you need to ensure that your environment also supports older versions of the tools in use. There are tools such as brew & chocolatey which help you with the installation and management of your machine. And tools such as jenv allow you to per directory define what the local version of the JVM in use is. But after installing the tenth tool with env as a suffix it becomes a bit cumbersome. Lazyiness creeps in and we forget to properly manage the dependencies of our development environment. I once had to hotfix a presentation I created an hour before I was giving the presentation as I was using reveal.js and there was a node.js version compatibility issue.
And dependencies are not the only thing we need to worry about! We still have to maintain git configurations, IDE extensions, dotfiles, environment variables, etc. And that is just your development environment, what about your team members environment? Or the environment of the person working on the project 2 years down the line? Ideally you would just start with a clean and reproducible environment per project. But the amount of bash scripting required too maintain this is too high! Everybody has a neglected dotfiles repository somewhere.
Luckily, Visual Studio Code (vscode) has released a feature called Dev Containers that allows you to dockerize your entire development environment! Even vscode itself! In this post I will show you how you can get started with Dev Containers and how you can ensure a clean working environment for each project. Even better, the configuration is easily shareable. As long as your teammates also use vscode, they can reuse the same dockerized environment!
Getting Started
To make use of the Dev Containers feature in vscode you need to make sure that you install the Visual Studio Code Remote - Containers extension in vscode. And of course, as Docker is used to create isolated development environments, you need to have Docker installed on your machine.
To install the extension, open the extensions panel in vscode (The shortcut is Ctrl + Shift + x on Linux/Windows or Cmd + Shift + x on Mac). Once you have installed the extension we can get started!
As an example, I am going to show how to create a dockerized development environment for Python. It is quite easy while developing in python to accidentally forget to install a python package in your virtualenv and instead install it globally. An Python version can be quite hard to manage as well. Especially since some operating systems come with a really outdated version of Python. But there is nothing that prevents you to use this same feature for Java development, or React development, or C development.
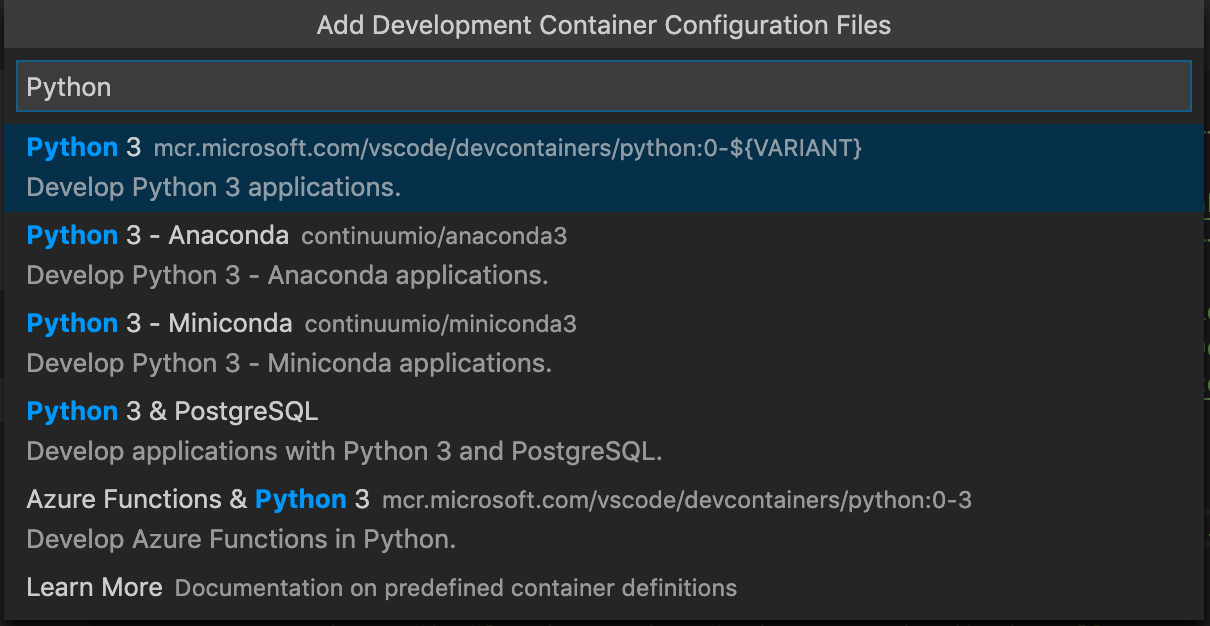
So let’s say we are building a new Flask microservice. Let’s start by creating a new directory called app. Then we will open that app inside a new Dev Container with vscode. Go to the Command Pallete (Ctrl + Shift + p on Linux/Windows or Cmd + Shift + p on Mac) and type Remote-Containers: Open Folder in Container... and open the newly created directory. It will ask you to select a base image to use as a starting point for your environment. Make sure you search for the Python 3 Docker image (A full list of all the available images and their definition can be found on Github):
A status bar will appear in the bottom right corner of your screen. It might take a few minutes to complete as vscode is pulling the docker image to your local system. After it completes both vscode as well as your development environment will be running inside of the Docker container. You can verify this by opening the terminal (Ctrl + ` ) and checking the new environment. If you are like me, the first thing you will notice is the lack of Oh My Zsh. You can also check by verifying that the only user in /home is a user called vscode.
vscode itself actually runs inside the container as well! You can check this by looking at the installed extensions in vscode: Only the ms-python extensions is installed (it comes default with the Python 3 image). What is great about that is that is is now really easy to share the same configuration & extensions with your teammates. And it makes sure that you can manage extensions per project!
To test what we can do in the new work environment, let’s create a really simple Flask App in a file called app.py:
from flask import Flask
app = Flask(__name__)

@app.route('/')
def hello_world():
    return 'Hello, World!'
Couldn’t be simpler. You might have noticed some squiggly lines under the import statement when you created this file in vscode. It is a pylint error stating that flask is unavailable in this environment. We did not install flask yet. The Python 3 Dev Container image comes with a lot of python utilities such as pylint & pytest. Let’s create a requirements.txt file and install Flask:
pip3 install --user -r requirements.txt
This installs flask globally inside the image. We can now use the flask run command to run the app:
env FLASK_APP=app.py flask run
Your Flask app should now be running inside of the container. Using curl we can check if the app is indeed running: curl localhost:5000 should return a response of Hello, World!.
It is important to note that installing the requirements needs to be repeated on each restart of the container, as Docker removes all uncommitted changes after the container stops. This is of course rather annoying. Maybe we can edit our Dev Container to automatically install the requirements?
You might have noticed that a new directory .devcontainer was added. This contains a Dockerfile that defines the Dev Container, and it contains a devcontainer.json file. This ensures that you can consistently rebuild your local development environment. Both these files can be used to customize your development environment.
Customizing your environment
Now let’s see how we can customize our environment and dive into the .devcontainer directory. The devcontainer.json file inside this tells vscode how to create (or access) the dev-container:
// For format details, see https://aka.ms/vscode-remote/devcontainer.json or this file's README at:
// https://github.com/microsoft/vscode-dev-containers/tree/v0.112.0/containers/python-3
{
	"name": "Python 3",
	"build": {
		"dockerfile": "Dockerfile",
		"context": "..",
		// Update 'VARIANT' to pick a Python version. Rebuild the container
		// if it already exists to update. Available variants: 3, 3.6, 3.7, 3.8
		"args": { "VARIANT": "3" }
	},

	// Set *default* container specific settings.json values on container create.
	"settings": {
		"terminal.integrated.shell.linux": "/bin/bash",
		"python.pythonPath": "/usr/local/bin/python",
		"python.linting.enabled": true,
		"python.linting.pylintEnabled": true,
		"python.formatting.autopep8Path": "/usr/local/py-utils/bin/autopep8",
		"python.formatting.blackPath": "/usr/local/py-utils/bin/black",
		"python.formatting.yapfPath": "/usr/local/py-utils/bin/yapf",
		"python.linting.banditPath": "/usr/local/py-utils/bin/bandit",
		"python.linting.flake8Path": "/usr/local/py-utils/bin/flake8",
		"python.linting.mypyPath": "/usr/local/py-utils/bin/mypy",
		"python.linting.pycodestylePath": "/usr/local/py-utils/bin/pycodestyle",
		"python.linting.pydocstylePath": "/usr/local/py-utils/bin/pydocstyle",
		"python.linting.pylintPath": "/usr/local/py-utils/bin/pylint",
		"python.testing.pytestPath": "/usr/local/py-utils/bin/pytest"
	},

	// Add the IDs of extensions you want installed when the container is created.
	"extensions": [
		"ms-python.python"
	]

	// Use 'forwardPorts' to make a list of ports inside the container available locally.
	// "forwardPorts": [],

	// Use 'postCreateCommand' to run commands after the container is created.
	// "postCreateCommand": "pip3 install --user -r requirements.txt",
}
The build section defines how to build the Dockerfile and provides the context in which to build the Docker image along with any other arguments needed to build the Docker image. The settings section actually defines the settings of the vscode instance running inside of the container. This ensures you and your teammates always use the same settings in your local environment. In the python image some settings are already predefined, such as the setting that enables linting inside of vscode. The extensions section defines the installed extensions inside of the vscode instance in the container. It expects the ID of the extension, rather then the name. For example, if I wanted to add the PyDoc extension to generate PyDoc strings I would add the following ID: reddevil.pythondoc. The forwardedPorts section allows you to expose a list of ports from inside the container. This can be useful whenever you want to view your app from e.g. the browser.
The postCreateCommand is exactly what we looked for in the previous section of this blog: A way to run a command after startup. This means we can easily keep our requirements up to date and install them each time we open vscode and start the Dev Container. Let’s uncomment the postCreateCommand and restart our container. You can use the Remote-Containers: Rebuild Container command to restart the Dev Container, which you should do anytime the configuration changes. Once the process is finished (which should be quick as we did not change anything inside of the Docker container itself, we just added a command that should run post creation) we can open a terminal and verify if the flask command is still available.
What if we wanted to install additional tools in our container? For example at a certain point of the development of our Flask microservice we have to prepare for deployment. This often means wrapping the app in a Docker container and deploying it to a Kubernetes cluster. We can customize the Dev Container and include Docker by adding a RUN statement to the Dockerfile in our devcontainer directory:
ENV DEBIAN_FRONTEND=noninteractive
RUN apt-get update \
    && apt-get -y install --no-install-recommends \
    apt-transport-https \
    ca-certificates \
    curl \
    gnupg2 \
    software-properties-common \
   && curl -fsSL https://download.docker.com/linux/debian/gpg | sudo apt-key add - \
   && add-apt-repository "deb [arch=amd64] https://download.docker.com/linux/debian $(lsb_release -cs) stable" \
   && apt-get update \
   && apt-get -y install --no-install-recommends docker-ce \
   # Clean up
   && apt-get autoremove -y \
   && apt-get clean -y \
   && rm -rf /var/lib/apt/lists/*
ENV DEBIAN_FRONTEND=dialog
This RUN statement adds Docker Repository and the required dependencies to install Docker and then installs the latest stable release of Docker for Debian. If we restart our Dev Container Docker should be available in our environment. You can test this with the docker --version command. Let’s add a simple Dockerfile for our Flask app:
FROM python:3

WORKDIR /usr/src/app

COPY requirements.txt ./
RUN pip3 install --user -r requirements.txt

COPY . .

ENV FLASK_APP app.py
CMD ["flask", "run"]
Now let’s try to build the Docker image inside of our Dev Container:
docker build -t hello-world:latest .
Hmm, we get an error: Cannot connect to the Docker daemon at unix:///var/run/docker.sock. Is the docker daemon running?. The Docker Daemon is not running. We are trying to build Docker containers inside of a Docker container. How do we get Docker in Docker?
Docker in Docker
In order to use the Docker CLI you need a Docker Daemon available on from inside the Dev Container. There are a number of technical reasons why it is a bad idea to start a Docker Daemon inside a Docker container. If you want to read more, you could check out Jérôme Petazzoni’s blog on this topic. Luckily there are other ways we can make Docker in Docker work. You can actually connect Docker to the Docker Daemon running on your machine!
In order to connect the Dev Container to the Docker Daemon, we need to mount the unix socket the Docker Daemon listens to. Add the following snippet to your devcontainer.json file:
"mounts": [ "source=/var/run/docker.sock,target=/var/run/docker-host.sock,type=bind" ],
And the following snippet to the Dockerfile:
RUN ln -s "/var/run/docker-host.sock" "/var/run/docker.sock"
And use the Remote-Containers: Rebuild Container command to restart the Dev Container. Now when you run docker build -t hello-world:latest . the Docker container should be build from inside the container. You can use docker image ls to verify that your image is build. Actually, you can see all images from your local machine, but this is because the Dev Container is connected to the Docker Daemon on your machine. For a more advanced configuration of Docker in Docker, I suggest you check out the example provided by Microsoft.
Conclusion
Hopefully I showed you how you can use Dev Containers to create a reusable and shareable development environment. I showed you the basics of configuring the Dev Container and the instance of vscode that is running inside of the container. But there is still a lot that you can explore. For example, you can attach the Dev Container to a a Kubernetes cluster and run it form inside or you could preload it with your Dotfiles. I definitely suggest you give it a try, even if Visual Studio Code is not your IDE of choice.